How to Fix a Leaking Faucet at Home
DIY Plumbing Solutions for Your Home
1. Introduction to Faucet Leaks
Faucet leaks are one of the most common plumbing issues faced by homeowners. These leaks can waste significant amounts of water and increase your utility bills. Understanding the common causes of faucet leaks and the importance of addressing them promptly is crucial for maintaining a healthy home environment.
Common Causes of Faucet Leaks
- Worn-out washers or O-rings
- Damaged or corroded valve seats
- Loose or improperly installed parts
- Inadequate tightening of connections
Importance of Fixing Leaks Promptly
A leaking faucet not only wastes water but can also lead to more serious issues like water damage and mold growth. Addressing leaks early can save you money on repairs and prevent potential health hazards.
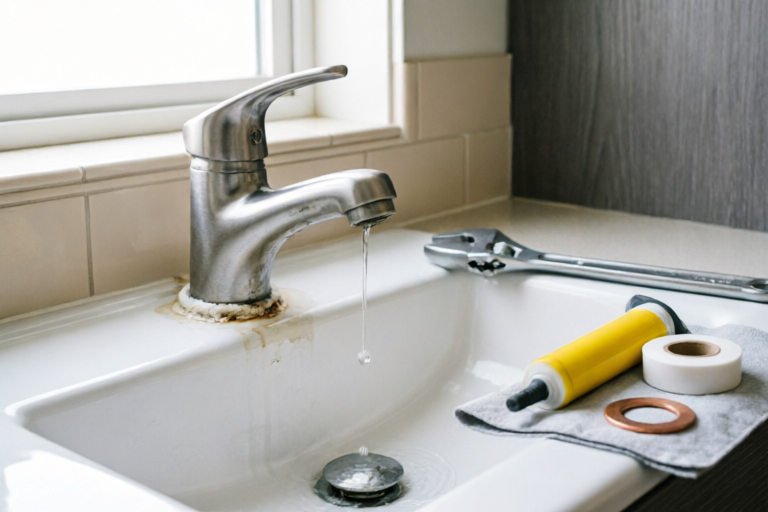
Tools and Materials Needed for Repairs
- Adjustable wrench
- Phillips and flathead screwdrivers
- New washers and O-rings
- Replacement valve seat
- Plumber's putty or silicone sealant
2. Identifying the Type of Faucet
The first step in fixing a leaking faucet is identifying the type of faucet you have. Different types require different repair methods, so it's important to understand the differences between compression, ball, cartridge, and ceramic disk faucets.
Differentiating Between Types of Faucets
- Compression Faucet: Uses two handles and has a washer that needs to be replaced when worn out.
- Ball Faucet: Has a single handle and uses a ball-shaped assembly with multiple springs and seals.
- Cartridge Faucet: Uses a cylindrical cartridge to control water flow and temperature.
- Ceramic Disk Faucet: Utilizes two disks that rotate against each other to control water flow.
How to Identify Which Type You Have
Look at the handles and internal components of your faucet to determine its type. If you're unsure, consult the manufacturer's website or contact a professional plumber for assistance.
Why This Matters for Repair Methods
Each type of faucet requires specific tools and techniques for repair. For example, a compression faucet may simply need a new washer, while a ball or cartridge faucet might require disassembly and replacement of the entire cartridge.
3. Steps to Turn Off Water Supply
Before beginning any repairs, it's essential to turn off the water supply to your faucet to prevent water from flowing during the repair process.
Locating the Shut-Off Valves Under the Sink
Shut-off valves are typically located under the sink, near the base of the faucet. Look for two valves—one for hot water and one for cold water.
Proper Procedure for Turning Off Water Supply
- Turn the shut-off valves clockwise until they are fully closed.
- Open the faucet to release any remaining water in the lines.
- Check the faucet to ensure no water is coming out.
Ensuring Safety During Repairs
Always ensure the water supply is completely turned off before starting repairs. This will help prevent accidents and ensure a safe working environment.
4. Diagnosing the Leak
Once the water supply is off, it's time to diagnose the exact location of the leak. This involves checking for visible signs of wear or damage and testing different parts of the faucet.
Checking for Visible Signs of Wear or Damage
- Inspect the handles for loose screws or damaged parts.
- Look for cracks or corrosion around the base of the faucet.
- Check the aerator for mineral buildup or debris.
Testing Different Parts of the Faucet for Leaks
- Test the hot and cold water separately by opening and closing the handles.
- Check the spout for dripping water.
- Inspect the base of the faucet for any signs of moisture.
Using Simple Techniques to Pinpoint the Source
Use a flashlight and a small mirror to inspect hard-to-reach areas. Apply pressure to different parts of the faucet to see if the leak worsens. This can help you narrow down the exact cause of the leak.
5. Repairing the Leak
Once you've identified the source of the leak, it's time to begin the repair process. The steps involved will vary depending on the type of faucet, but we'll cover some common fixes here.
Step-by-Step Guide for Common Fixes (e.g., Replacing Washers)
- Disassemble the faucet by removing the handles and any decorative caps.
- Use an adjustable wrench to remove the bonnet nut.
- Remove the old washer and replace it with a new one.
- Reassemble the faucet and test for leaks.
Detailed Instructions for Each Type of Faucet
- Compression Faucet: Replace the washer and O-ring if necessary.
- Ball Faucet: Remove the handle and cartridge assembly, replace any damaged parts, and reassemble.
- Cartridge Faucet: Remove the cartridge, clean or replace it, and reinstall.
- Ceramic Disk Faucet: Inspect and replace any damaged disks or seals.
Tips for Successful DIY Repairs
- Ensure all parts are properly aligned and tightened.
- Use plumber's putty or silicone sealant to secure any moving parts.
- Test the faucet thoroughly after reassembly.
6. Final Checks and Maintenance
After completing the repairs, it's important to perform final checks and implement preventative maintenance to avoid future leaks.
Reassembling the Faucet After Repairs
Double-check that all parts are correctly positioned and tightened. Ensure the handles are securely attached and that the aerator is properly installed.
Testing the Faucet for Proper Function
Turn on the water supply and check for leaks. Test both hot and cold water, and ensure the faucet operates smoothly without any drips.
Preventative Maintenance Tips to Avoid Future Leaks
- Regularly clean the aerator to prevent mineral buildup.
- Check for loose or damaged parts periodically.
- Apply plumber's grease to moving parts to keep them lubricated.
7. Conclusion
In this guide, we've covered the basics of fixing a leaking faucet, from identifying the type of faucet to diagnosing and repairing leaks. By following these steps, you can save money on professional plumbing services and maintain your home's plumbing system effectively.
Summary of Key Points Covered
- Identify the type of faucet.
- Turn off the water supply before starting repairs.
- Diagnose the leak and pinpoint the source.
- Repair the leak using appropriate methods.
- Perform final checks and implement preventative maintenance.
Encouragement for Homeowners to Tackle Repairs Themselves
Fixing a leaking faucet is a manageable task for many homeowners. With the right tools and a bit of patience, you can save money and gain valuable skills in home maintenance.
Resources for Further Assistance if Needed
If you encounter difficulties during the repair process, consider consulting online forums, watching tutorial videos, or contacting a professional plumber for assistance.
Comments

This saved me a trip to the plumber. Quick fix and now no more water waste. Happy days!

Thanks for the guide! I learned that identifying the faucet type is crucial. My ceramic disk faucet was trickier.
Same issue here. Will try this weekend. Any advice for someone who's never done this before?

I tried this but my faucet is still leaking. Could it be something else like a bad O-ring?

This worked for me! Thanks for the step-by-step. I was worried about turning off the water supply but it was easier than expected.

I have a ball faucet. Any tips specific to that type? The guide mentions them but doesn't go into detail.

Great guide! Just fixed my compression faucet using these steps. Took me about an hour. Would recommend.

Same issue here. I replaced the washer and it stopped leaking immediately. Saved a lot of money!