How to Fix a Leaking Faucet Quickly at Home Today?
Stop the Drip, Save Your Wallet.
How to Fix a Leaking Faucet Quickly at Home Today?
A steady drip from your kitchen or bathroom faucet may seem like a minor annoyance, but it is a silent thief draining your wallet and wasting precious resources. There is nothing more irritating than lying awake at night listening to the rhythmic plink-plink-plink of water hitting the bottom of the sink. Fortunately, you do not need to hire a professional plumber for every issue. Most common faucet leaks can be resolved quickly, easily, and affordably with the right knowledge and tools.
This comprehensive guide will walk you through everything you need to know to fix a leaking faucet quickly at home today. We will cover why immediate action matters, the essential tools you will need, how to identify your specific faucet type, a detailed step-by-step repair procedure, and crucial maintenance tips to prevent future issues. By the end of this article, you will be equipped to stop that annoying drip and restore peace to your home.
1. Why Immediate Action Matters: Beyond the Annoying Noise
Many homeowners delay fixing a minor leak, believing it is not a big deal until the bill arrives. However, ignoring a leaky faucet can lead to cascading problems that far outweigh the cost of a few minutes of DIY work.
The Financial Impact of Water Waste
It is easy to underestimate the amount of water wasted by a single drip. According to the Environmental Protection Agency (EPA), a faucet that drips once per second wastes approximately 3,000 gallons of water annually. That equals about $180 in wasted water costs per year for an average household. If you have multiple leaking faucets, those costs multiply rapidly. Over a five-year period, a single dripping faucet could waste tens of thousands of gallons and cost hundreds of dollars unnecessarily. Fixing it today is an investment that pays back immediately.
Structural Damage and Health Hazards
Water is destructive. Continuous leakage, especially if it is underneath a sink cabinet, can cause significant damage to your home's infrastructure. Moisture seeping into wooden cabinetry leads to warping, swelling, and eventual rot. In severe cases, prolonged exposure can compromise the structural integrity of the cabinets or the floor beneath them. Furthermore, damp environments are breeding grounds for mold and mildew. Mold spores can spread through the air and pose serious health risks, particularly for individuals with respiratory issues or allergies. Addressing the source of the leak promptly prevents expensive remediation and protects your family's health.
Pipe Stress and Corrosion
Constant dripping puts stress on your plumbing system components. Valves and seals are designed to operate under pressure, and continuous moisture erosion can accelerate corrosion on metal fixtures. If left unchecked, a small washer failure can escalate into a cracked pipe fitting, turning a simple repair job into a major plumbing emergency. Acting now ensures the longevity of your entire plumbing network.
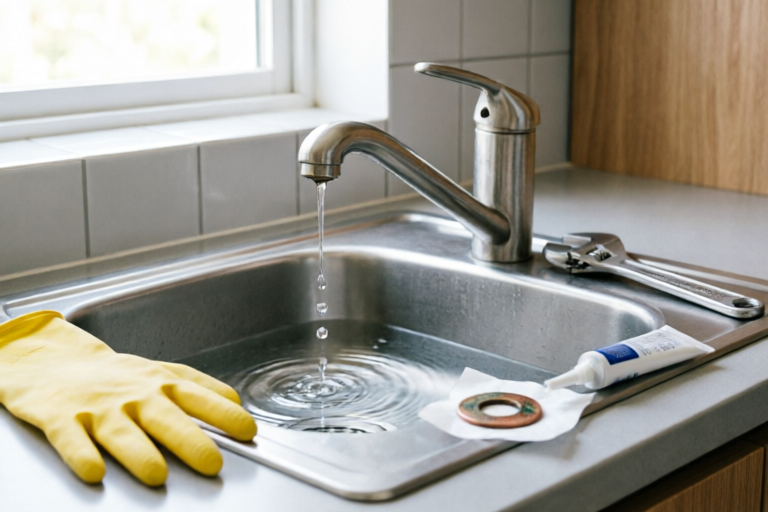
2. Essential Tools and Replacement Parts
Before you start unscrewing anything, preparation is key. Having the right equipment on hand ensures a smooth workflow and reduces the risk of damaging the fixture while attempting repairs. Here is the definitive checklist of items required for most residential faucet repairs.
Hand Tools
- Adjustable Wrench: A versatile tool essential for loosening nuts and tightening connections. Make sure it has a protective coating or rubber grip to avoid scratching chrome finishes.
- Screwdrivers: You will need both flathead and Phillips head screwdrivers. Consider getting a set with precision bits, as some manufacturer handles use Torx or hex screws.
- Slip-Joint Pliers: Useful for gripping curved surfaces and holding small parts during disassembly.
- Basin Wrench: If you are working on a deep sink, a basin wrench is invaluable. Its long shaft and pivoting jaw allow you to reach tight spaces behind the sink basin where nuts are secured.
- Flashlight or Headlamp: Visibility is often poor under sinks. A light source helps you inspect parts and ensure nothing is left behind during reassembly.
- Rag and Towels: Always lay down dry towels. You will likely have residual water in the lines, and catching this prevents flooding your lower cabinets.
Consumables and Safety Gear
- Plumber's Grease: Silicone-based lubricant used to coat O-rings and threads. This ensures smooth operation and creates a watertight seal during reassembly.
- Teflon Tape (Pipe Thread Sealant): Essential if you need to replace threaded connections on supply lines to prevent leaks at the joint.
- Replacement Parts Kit: Depending on your faucet model, you may need specific washers, O-rings, cartridges, or ball assemblies. It is best to buy a universal repair kit compatible with your brand or visit a hardware store with the old part to ensure an exact match.
- Gloves: Working under a sink involves grease, grime, and potentially sharp edges. Rubber gloves keep your hands clean and protected.
3. Identifying the Faucet Type and Leak Source
Not all faucets are created equal. The method of repair depends heavily on the internal mechanism of the faucet. Misidentifying the type can lead to buying the wrong parts and failing to stop the leak. Understanding the four common faucet types is crucial for diagnosis.
Compression Faucets (Widespread)
These are the traditional faucets with separate hot and cold handles. You know this type because you have to tighten it fully to shut it off; the lever turns against a rubber stem. Inside, a rubber washer sits at the base of the stem seat.
- Typical Leak Point: Water drips from the spout even when the handle is turned off, caused by a worn-out washer.
- Fix Complexity: Moderate. Requires replacing the washer and possibly reseating the valve seat.
Cartridge Faucets
These are common in kitchen sinks with a single handle or two handles. Instead of a washer, they use a plastic or brass cartridge that controls the flow. They are easier to turn because there is no friction grinding against a seat.
- Typical Leak Point: Dripping from the spout or leaks around the base of the handle.
- Fix Complexity: Easy to Moderate. Usually involves pulling out the old cartridge and inserting a new one.
Ball Faucets
Common in bathrooms with a single handle that moves across the top. These contain a rotating ball with slots for hot and cold water. Inside, rubber seals and springs control the water.
- Typical Leak Point: Leaks often come from the spout when the faucet is on, or water leaks out of the sides of the faucet body.
- Fix Complexity: Moderate to Difficult. Requires removing the ball assembly and replacing seals and springs.
Ceramic Disk Faucets
These are among the newest and most durable designs. They feature a sleek handle movement and contain a pair of ceramic discs. They rarely leak and require very little maintenance.
- Typical Leak Point: Generally, if they leak, the seals around the disks are worn or debris is stuck between the discs.
- Fix Complexity: Difficult. Often requires specialized tools or replacing the entire cartridge unit.
Identifying the Leak Source
Once you know the type, locate the leak. Is the water coming out of the spout? Or is it pooling around the base where the faucet meets the countertop? Spout leaks indicate internal failure (washers/cartridges), while base leaks suggest loose mounting or dried O-ring seals on the shank.
4. Step-by-Step Repair Procedure
Now that you have gathered your tools and identified your faucet, let’s dive into the core process of repairing the leak. Follow these steps meticulously to ensure success.
Step 1: Turn Off the Water Supply
This is the non-negotiable first step. Locate the shut-off valves under your sink. There are usually two, marked with blue (cold) and red (hot). Turn them clockwise until they stop. If your sink lacks individual valves, you must turn off the main water supply to the house.
Open the faucet handle fully to drain the remaining water in the pipes. This relieves pressure and prevents spraying when you disconnect parts.
Step 2: Plug the Sink Drain
While disassembling, small screws, o-rings, and springs are prone to disappearing. Place a plug in the drain or cover it with a towel. Losing a tiny component into the sewer trap is a nightmare that requires calling a plumber to access the pipe again.
Step 3: Remove the Handle and Decorative Caps
Most handles have a decorative cap on top. Look for a small hole or slot on the cap. Use a small screwdriver or knife tip to pry it off. Underneath, you will find a screw securing the handle. Remove this screw.
In some models, the handle simply pulls up or twists off after the cap is removed. Lift the handle gently. If it is stuck, wiggle it side-to-side. Do not force it if it seems seized, as you may snap the plastic or chrome.
Step 4: Disassemble the Internal Mechanism
For Compression Faucets: Unscrew the packing nut above the valve stem. Pull out the stem. Inspect the rubber washer at the bottom. If it is cracked or deformed, replace it. Tighten the retaining screw if it was loose.
For Cartridge Faucets: Once the handle is off, remove the retaining clip or nut holding the cartridge. Pull the cartridge straight out. Note the orientation before removing. Clean the area with a soft cloth to remove mineral buildup.
For Ball Faucets: Remove the retainer clip and lift out the cam and ball assembly. Inspect the rubber seats and springs beneath the ball.
Step 5: Replace the Worn Part
This is the heart of the repair.
- Match Old to New: Take your old washer or cartridge to the hardware store if you aren’t certain of the size. Exact matches are vital for sealing.
- Cleaning: Before installing new parts, scrub the interior housing with vinegar to dissolve lime scale. Scale buildup causes uneven seals and premature failure.
- Lubrication: Apply a thin layer of plumber’s grease to new O-rings and washers. This extends their life and ensures easy installation.
- Installation: Insert the new component firmly. For cartridges, align the tabs correctly so they fit into the slots in the faucet body. If misaligned, the faucet will not function or will leak.
Step 6: Reassemble the Fixture
Reverse the disassembly steps. Put the stem or cartridge back in place. Reinstall the handle. Secure the screw and replace the decorative cap. Ensure all knobs and nuts are snug but do not overtighten, as this can crush new gaskets or strip threads.
5. Testing for Success and Maintenance Tips
You have done the work; now it is time to verify the repair. Patience here saves embarrassment later.
Restoring Water Flow
Slowly turn the water supply valves counter-clockwise. Listen for air hissing, which indicates the system is refilling. Allow the pipes to pressurize fully. Close the faucet completely. Wait a moment and observe the spout.
If the drip has stopped, your repair was successful. Open the faucet slowly to check for proper flow direction and temperature control. Close it again. Sometimes, air trapped in the lines causes brief spurting or sputtering, which settles after a minute.
Troubleshooting Residual Drips
If the faucet continues to drip after replacement:
- Check Seals: Did you lubricate the new washer? Dry rubber sometimes slips slightly.
- Tightness: Is the packing nut tight enough? Too loose allows bypass; too tight increases wear.
- Debris: Was there dirt in the valve seat preventing a perfect closure? Clean it again with a brush.
- Overtightened Screw: Sometimes the handle screw compresses the mechanism too much, forcing the washer away from the seat.
General Maintenance to Prevent Future Leakage
To extend the life of your newly repaired faucet, adopt these habits:
- Aerate Regularly: Clean your faucet aerator once a year. Mineral deposits accumulate here and affect performance.
- Lubricate Annually: Apply silicone grease to moving O-rings and stems once a year to prevent drying and cracking.
- Don’t Force Handles: Never use excessive force to turn the faucet on or off. This strains the internal seals. If it gets stiff, it may be time for a lubrication service.
- Cold Water Only: Avoid running extremely hot water continuously if you have brass components, which can corrode faster under constant high heat. Cycle through temperatures if the faucet allows.
- Inspect Supply Lines: Every few months, check the braided steel lines under the sink for signs of bulging or rust. Replace hoses every 5 to 7 years regardless of visible condition.
Frequently Asked Questions (FAQ)
Q: Can I fix a leak without turning off the main water?
A: Yes, if your sink has individual shut-off valves. This is standard in modern homes. If you only have a main valve, shutting it off temporarily affects the whole house, so it is better to coordinate with roommates or family members during peak usage times.
Q: How much does a professional faucet repair cost?
A: Hiring a plumber typically costs between $150 to $350 depending on your location and the complexity of the leak. Parts usually cost less than $20. Doing it yourself saves this fee entirely.
Q: Is it worth fixing a cheap faucet versus replacing it?
A: For inexpensive, generic faucets, the labor hours might not justify replacing old internal parts. If the faucet body is corroded or made of low-quality materials, buying a new fixture ($50-$100) might be more cost-effective in the long run.
Q: My faucet still squeaks after repair. Why?
A: Squeaking is usually caused by lack of lubrication on the rubber washers or stems. Apply silicone spray or plumber’s grease to the contact points between the washer and the valve seat.
Q: What if the screws are stripped?
A: Stripped screws are a common frustration. Try using rubber bands to increase grip or penetrating oil (like WD-40) to loosen rusted threads. If that fails, a small drill bit (left-handed) may help extract the screw, but proceed with extreme caution not to damage the finish.
Conclusion
Fixing a leaking faucet quickly at home today is an empowering task that combines resourcefulness with basic mechanical skills. By understanding the importance of the repair, gathering the correct tools, and following a logical disassembly and replacement process, you can eliminate water waste, lower utility bills, and protect your home from water damage. Remember, regular maintenance is the key to longevity. Don’t wait for a burst pipe to take action on that slight drip—take action now. With the guide above, you are well-equipped to tackle the problem confidently. Stop the drip, save your wallet, and enjoy a dry, quiet home.
Comments

Quick q - do I need to shut off the main water or just the valves under the sink? Didn't want to dry up the whole house for 30 mins.

Same issue here! Turns out it wasn't the washer, just the o-ring. Glad you mentioned checking types first.
Ugh, my screw head is stripped instantly 😭. Any tips on extracting it without ruining the chrome finish?

Called a landlord first but he said go ahead and fix it if I can. Used your method and saved $100 on a call. Thanks!

Pro tip: Tape the drain stopper before you take anything apart. Don't ask me how I know, lost a whole valve nut last week lol.

Wait, does this work for Moen cartridge models too? Mine won't stop dripping even after I tightened everything down 😩

Finally got my kitchen faucet to stop dripping! Took about an hour but following step 3 made all the difference. Definitely replace those washers ASAP.